mardi 30 décembre 2008

PoshBoard v0.3.5 Released ! Compatible with Silverlight 2.0 Final

Hi,

Here is my first good resolution for 2009 : 
Releasing a new version of PoshBoard !

PoshBoard v0.3.5 is now available at codeplex just here

What's New ?

  • -PoshBoard is now fully compatible with silverlight 2.0 Final
  • -Updated to last version of AgDatagrid (December 2008 release) and visifire (2.0.5 Beta) 
  • -BugFix in datagrid generation
  • -New edit feature for visifire charts : you can now select the type of charts and define Charts name in the Edit Section. 
important : to draw a chart, you now need to pass one or several hashtables to the built-in "out-visifire" function 

out-visifire($myHashTable)
or
out-visifire($myHashTable1,$MyHashTable2)

  • -The user guide is updated with last information to ease your installation : read it carefully

Another good news : great support for poshboard !

Jeffrey Snover (Creator of PowerShell) has posted two really cool articles about PoshBoard and HashTable generation on the PowerShell Team Blog : you can read them here and here.

Thank you Jeffrey for your support on this project !


Happy new Year to all of you !


mercredi 19 novembre 2008

New version of PoshBoard coming soon !

Some news about PoshBaord :

Development is ongoing of course ! :), a bit delayed by professionnal constraints.

With the release of Silverlight 2.0 and upcoming Dropthings 1.8.0, a new version of PoshBoard will be available shortly :

So, what's coming ?

Update with Silverlight 2.0 and Dropthings 1.8.0, with addional features :

  • You'll be able to create dynamic widgets based on ironPyhon ! on the fly customisation with ironpython code or with a little gadget designer !
  • You'll be able to import and export custom widgets ! We'll be able to share widgets with the community
  • New widgets based on Silverlight control toolkits

Your inputs, suggestions are as always very usefull, please give me your feedback !

News coming soon, stay tuned.

mercredi 10 septembre 2008

PowerShellPlus Profesionnal for free ? listen to PowerScripting Podcast !

There's always great news and tips in the PowerScripting Podcast, this time there's a great deal : if you follow the link provided in the 40th edition, you'll be able to get a FREE licence of PowerShellPlus !

Just on thing to do : go to PowerScripting Podcast site, listen to this great talk-show on PowerShell, and follow the link to PowerShellPlus Beta : once it's available, you'll get your free licence !


mardi 26 août 2008

PoshBoard installation guide available

A quick note to tell you that the Installation Guide for PoshBoard is now available here.

You'll learn step by step how to use the source with visual studio/web express and how to publish it on your server/workstation.

Update : now the user guide explains how to use every widgets !

lundi 25 août 2008

PoshBoard 0.3 is out !

Update : sources are now available at codeplex, user guide to follow...

Coding can be really, really fun ! all is getting nicely and I'm pleased to present you the version 0.3.0 of PoshBoard on Codeplex.


What's New ?
  1. Based on Dropthings 1.7.0 : database is now included in the project, using SQL 2005 Express is now easy !
  2. Added a Silverlight Datagrid widget
  3. Added a DevExpress AgDatagrid widget (great open source silverlight control)
  4. Added PowerShell standard output

What's missing ?

Well, a lot of things are coming ! first the source code.. but others widgets are ready to strike. I'm now working on cleaning up the code, making more error handling in PowerShell, Transform the Visifire PowerShell code...


...there's some nice surprises coming soon, stay tuned to my blog for more info !

How to use it ?

(Updated) now a user guide is available at codeplex ! Read it to learn how tu install/configure the website or Visual studio project (with visual and visual express), and how to use the widgets !


mercredi 30 juillet 2008

PoshBoard second video : Adding DataGrid to the mix !

French version here

Here is a second video on PoshBoard, my open source IT web portal project. In this one you'll find some news on the upcoming 0.3 version of Poshboard (available here soon at codeplex) :

Launch and click on the HD icon, then go full screen (or click here where you can download it), I strongly recommend it cause my recording did some strange rescaling this time ! :)


PoshBoard 2nd video : new widgets, new Dropthings GUI... from pilosite on Vimeo.


What's up ?

New widgets

- Silverlight DataGrid : a direct path from Powershell to Silverlight 2 Datagrid
- AgDatagrid from Developper Express : see how good a pro Silverlight Datagrid can be (Oh, it's free and open source... Great !)
- PowerShell standard Output : launch PowerShell script and get console output.

New front-end :


Discover the brand new dropthings version used in PoshBoard : custom columns layouts in action, new GUI... Dropthings is definitely an impressive Ajax/ASP.NET project !

A tutorial is coming explaining everything about PoshBoard (how to install It ? prerequisite for publishing ? Visual Studio configuration ? )

Feel free to ask questions in the comments, and please don't hesitate to use Issue tracker / discussion in Codeplex to help me improve PoshBoard !

Hope you like this new one ;)

vendredi 25 juillet 2008

AgDatagrid and Silverlight Datagrid : how to build a dynamic datasource ?

French version available HERE

Sample project is available just here.

Live Sample Below !


I'm working on AgDatagrid, a really cool open source and free silverlight control from DevExpress (see it in action here). Of course, my goal is to implement a Widget version for PowerShell Dashboard ;-)

I came across a little problem, and we got the same with standard silverlight Datagrid :

How to dynamically build the datagrid ?

AgDatagrid and Silverlight Datagrid use IList type to build the control Datasource. When using managed code (C# or VB.NET in silverlight development), you need to build a Class representing your data to build the IList :

   1: public class Person {   
   2:                 public string Name {   
   3:                      get;   
   4:                      set;   
   5:                 }   
   6:     
   7:                 public string City {   
   8:                      get;   
   9:                      set;   
  10:                 }   
  11:     
  12:                 public string State {   
  13:                      get;   
  14:                      set;   
  15:                 }   
  16:            }   
  17:     
  18: new Person() {   
  19: me = "Michael Jordan", City="Chicago", State="IL" },   
  20: new Person() {   
  21: me = "Kobe Bryant", City="Los Angeles", State="CA" },   
  22: new Person() {   
  23: me = "Shaquille O'Neil", City="Miami", State="FL" },   
  24: new Person() {   
  25: me = "Patrick Ewing", City="New York", State="NY" }    


  26:  


That's ok when you know what kind of data will be bound to the grid, but how to do this when you have dynamic content ?

I plan to use this grid to represent data coming from PowerShell... So I don't know how many column and type of Data I'll have to implement.

here is the point : I can't use a static class to define my Data in the Silverlight Control.

Game Over ?


Not Yet!

We could follow two path to achieve this :
  • Use Dynamic Language programming with Silverlight (ironPython,ironRuby, Managed JScript...) that let us build dynamically the control ?

  • Dynamically build the class in managed code ?
Using Dynamic language will be an elegant (and for me the best) way to do it. However, we're dealing with Beta version here, and it's not so easy to use external control and SL2B2 controls in this context (yet), so I won't explain it for now (waiting for the MS Silverlight Team to publish some samples on it ;) )

So, could we dynamically build the Class in our managed code ?

my answer is : YES !

How to generate typed objects dynamically

After some search (HEAVY search should I say), I just found this marvelous thread from Vladimir Bodurov on "how to generated dynamically typed objects in .NET :

http://www.simple-talk.com/dotnet/.net-framework/dynamically-generating--typed-objects-in-.net/

this is it ! Vladimir gives the magic code to build our objects that we could simply implement as a DataSource, without using static Class !

Ok, fine. Let's see now how I used it with AgDataGrid (You can very easily convert this to the standard Silverlight 2 Datagrid, but it's not as cool as DevExpress excellent grid :) )

Ok guys and girls, let's go into the code !

my sample projects is a very basic implementation of this solution in order to let you understand the where abouts.

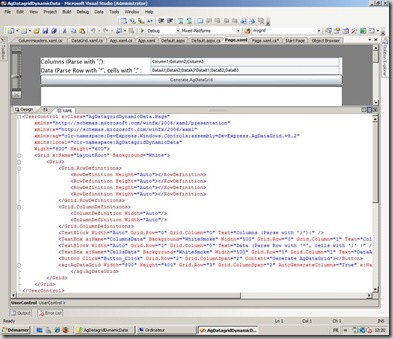
my Page.Xaml is pretty simple :

agdynamic2

I put 2 textbox (1 for Columns name, 1 for Datas), a button to build the grid, and the AgDatagrid. We could get Datas from outside, but it's another subject. let's keep it simple.

here is the code of the page.xaml :


   1: <UserControl x:Class="AgDatagridDynamicData.Page"   
   2:     xmlns="http://schemas.microsoft.com/winfx/2006/xaml/presentation"    
   3:     xmlns:x="http://schemas.microsoft.com/winfx/2006/xaml"    
   4:     xmlns:ag="clr-namespace:DevExpress.Windows.Controls;assembly=DevExpress.AgDataGrid.v8.2"   
   5:     xmlns:local="clr-namespace:AgDatagridDynamicData"   
   6:     Width="800" Height="600">   
   7:     <Grid x:Name="LayoutRoot" Background="black">   
   8:         <Grid>   
   9:             <Grid.RowDefinitions>   
  10:                 <RowDefinition Height="Auto"></RowDefinition>   
  11:                 <RowDefinition Height="Auto"></RowDefinition>   
  12:                 <RowDefinition Height="Auto"></RowDefinition>   
  13:                 <RowDefinition Height="Auto"></RowDefinition>   
  14:             </Grid.RowDefinitions>   
  15:             <Grid.ColumnDefinitions>   
  16:                 <ColumnDefinition Width="Auto"/>   
  17:                 <ColumnDefinition Width="Auto"/>   
  18:             </Grid.ColumnDefinitions>   
  19:             <TextBlock Width="Auto" Grid.Row="0" Grid.Column="0" Text="Columns (Parse with ';'):" />                   
  20:             <TextBox x:Name="ColumnsData" Background="blackSmoke" Width="500" Grid.Row="0" Grid.Column="1" Text="Column1;Column2;Column3"></TextBox>   
  21:             <TextBlock Width="Auto" Grid.Row="1" Grid.Column="0" Text="Data (Parse Row with '*', cells with ';' :" />
  22:             <TextBox x:Name="CellsData" Background="blackSmoke" Width="500" Grid.Row="1" Grid.Column="1" Text="DataA1;DataA2;DataA3*DataB1;DataB2;DataB3"></TextBox>     
  23:             <Button Click="Button_Click" Grid.Row="2" Grid.ColumnSpan="2" Content="Generate AgDataGrid"></Button>   
  24:             <ag:AgDataGrid Width="800" Height="400" Grid.Row="3" Grid.ColumnSpan="2" AutoGenerateColumns="True" x:Name="mygrid">   
  25:                 </ag:AgDataGrid>   
  26:         </Grid>           
  27:     </Grid>   
  28: </UserControl>


All is in the page.xaml.cs, let's study it.

I only use data from the Textbox in the silverlight Control (you can pass data from another source, but we'll see that later in my PowerShell AGDatagrid widget for example).

I use simple text parsing to build the grid :

  • column are parsed with ";"
  • Datas are parsed with "*" for each row, and in each row I parsed the cell with ";"
Of course, using XML definition would be more powerfull, but I keep it simple for this example. For example :

Column :

Column1;Column2;Column3

Data :

DataA1;DataA2;DataA3*DataB1;DataB2;DataB3*DataC1;DataC2;DataC3

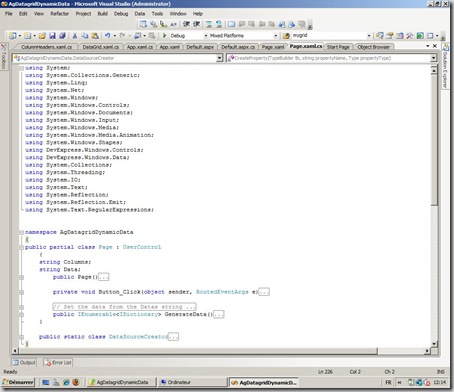
First, I put directly the DataSourceCreator Class of Vladimir in the Namespace of my control, without touching anything (this is what a call Magic Code)

agdynamic1


After inserting the code to call the library used by Vladimir's class (using System.Reflection;, etc...), let's defined our main code :

Let's have a look at our main class (UserControl ) :


   1: public partial class Page : UserControl   
   2:     {   
   3:     string Columns;   
   4:     string Data;   
   5:         public Page()   
   6:         {   
   7:             InitializeComponent();               
   8:         }   
   9:     
  10:         private void Button_Click(object sender, RoutedEventArgs e)   
  11:         {   
  12:     
  13:             mygrid.Columns.Clear();   
  14:             // Adding Columns to the AgDatagrid   
  15:             // With Column type added in the Columns string    
  16:             // we could use a Type checker and setting Column Type   
  17:             // from code behind :    
  18:             // mygrid.Columns.Add(new AgDataGridTextColumn() { FieldName = SingleColumn});     
  19:             Columns = ColumnsData.Text;   
  20:             Data = CellsData.Text;   
  21:             foreach (string SingleColumn in Columns.Split(';'))   
  22:             {              
  23:                 mygrid.AddColumn(SingleColumn);
  24:             }
  25:  
  26:             // Here we set the DataSource with a direct call to the function of
  27:             // Vladimir            
  28:             mygrid.DataSource = GenerateData().ToDataSource();        
  29:         }

What is done here ?

Nothing special in the public Page() function : We only Initialize the component.

all is in my "Button_Click" function :


   1: private void Button_Click(object sender, RoutedEventArgs e)   
   2: {
   3:  
   4:     mygrid.Columns.Clear();
   5:     // Adding Columns to the AgDatagrid
   6:     // With Column type added in the Columns string 
   7:     // we could use a Type checker and setting Column Type
   8:     // from code behind : 
   9:     // mygrid.Columns.Add(new AgDataGridTextColumn() { FieldName = SingleColumn});  
  10:     Columns = ColumnsData.Text;
  11:     Data = CellsData.Text;
  12:     foreach (string SingleColumn in Columns.Split(';'))
  13:     {                
  14:         mygrid.AddColumn(SingleColumn);
  15:     }
  16:  
  17:     // Here we set the DataSource with a direct call to the function of
  18:     // Vladimir            
  19:     mygrid.DataSource = GenerateData().ToDataSource();        
  20: }


first I clear the grid (without It, my function will be an "Add to the grid", not a "build the grid from scratch")

Then We get the value of Columns and Data from the 2 textbox.

After this, we build the column :


   1: foreach (string SingleColumn in Columns.Split(';'))
   2: {
   3:     mygrid.Columns.Add(new AgDataGridTextColumn() { FieldName = SingleColumn });
   4: }


I generate only TextColumn type. We could define the column Type in the string and generate appropriate column type in the foreach, but I keep it simple here.

Then we set the Datasource:


   1: mygrid.DataSource = GenerateData().ToDataSource(); 


We call the GenerateData function in the class (I got it from Vladimir Code) :


   1: public IEnumerable<IDictionary> GenerateData()
   2: {
   3:     string[] dataSplit = Data.Split('*');
   4:     int RowNumber = dataSplit.Count();
   5:     string[] ColumnSplit = Columns.Split(';');
   6:     int ColumnNumber = ColumnSplit.Count();
   7:     for (var i = 0; i < RowNumber; i++)
   8:     {
   9:         string[] cellData = dataSplit[i].Split(';');
  10:         var dict = new Dictionary<string, object>();
  11:         for (var j = 0; j < ColumnNumber; j++)
  12:         {
  13:             dict[ColumnSplit[j]] = cellData[j];
  14:         }
  15:        yield return dict;                
  16:     }             
  17: }


The main things here is this :

We declare a new Dictionnary and build it with Key and value :

key is the column name, value is the cell value. Here I dynamically set the column : I just parse the Column strings and use each element as Dictionnary key (dict[ColumnSplit[j]].

that's all !

As you see, it's pretty easy to build my AgDatagrid dynamically.

To go further, you can use XML strings instead of CSV-like format, put the column type in the Column Strings... possibilities are Endless !


Thanks to Azret and the support Team from DevExpress for their help, and thanks to Vladimir Bodurov for this really cool Code snippet !

questions ? Feel free to put comments on this post.


HAVE FUN with Silverlight !

vendredi 18 juillet 2008

PoshBoard and DevInfra in the Last PowerShell Podcast (33)

I'm pleased to tell you that Jonathan Walz & Hal Rottenberg from PowerScripting speak about PoshBoard and ASP.NET samples of my blog in the last PowerShell Podcast:

Episode 33 – Cage Match: PowerScripting vs. Quest

I'm really glad they like it, and I invite you to listen to this PodCast, It really worth it for many other reasons than poshboard ! :)

jeudi 10 juillet 2008

Poshboard preview available !

People asked me a preview of Poshboard to play with it : so be it ! A preview is now available on codeplex here, or follow this link : http://www.codeplex.com/poshboard

lundi 7 juillet 2008

PowerShell Dashboard : ASP.NET, Silverlight and PowerShell in a shaker !

Update : People asked me a preview of Poshboard to play with it : so be it ! A preview is now available on codeplex here, or follow this link : http://www.codeplex.com/poshboard

Here's a little video of my "coming soon" open source project called "PowerShell Dashboard" (PoshBoard for friends). This project will be available soon on the open source forge of my company Octo Technology.

The goal of this project is to deliver modular web portal based on PowerShell. The idea is to use Web GUI like igoogle, PageFlakes or Netvibes, for IT Admin and infrastructure management.

This will let you easely build infrastructure dashboards without the need to code in ASP.NET / AJAX / C# or other compiled language :

All you need to know is scripting
All you need to have is imagination.
;)


This project is based on Dropthings, a great ASP.NET/AJAX open source project by Omar Al Zabir, turned to an intranet project.

For this first teaser, I show you a first widget to generate Silverlight charts directly fom PowerShell scripts. I've used Chart generation (Column, pie...) with the great Silverlight charting library VISIFIRE (free and open source too)

This first demonstation presents the general concept of the web portal. It'll be freely available in the coming weeks. Then I'll propose several componants and innovations that will let you have much fun with PowerShell development ! :)

Here is the vidéo :


PowerShell Dashboard Web Portal Presentation from pilosite on Vimeo.


This video is in the HD Ready Format (1280x720), I strongly recommand you to click on the HD icon after launching the video to see it in full resolution (you can then go to full screen).

You can also click here and select full screen. Last but not least, you can also directly download it from this link !

Oh, by the way, forgive my exotic english, hope you'll understand everything, I try to do my best ! :)

Questions ? Ideas ? you can contact me by mail by clicking here.

lundi 26 mai 2008

PowerShell and ASP.NET Part 3

This is the third and last part of this little Tutorial on PowerShell and ASP.NET.

We will discuss about managing script from a webform and how to deploy this website on a IIS server.

Manage script

We saw previously how to execute PowerShell code from a Textbox. We will now learn how to manage on-the-fly changes on a prebuild PowerShell script.

This is a good method when you want, for example, create à provisioning or audit web portal. User won't write directly PowerShell code, but will fill a form that will then call a script with arguments.

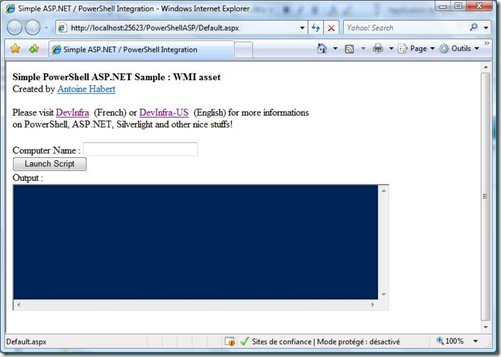
To illustrate this, here is another example with a WMI request engine that takes a machine name as parameter. I slightly modified our former example : I added a Textbox to put a machine Name :

powerASP4

Let's see what changed in our code. Ny the way, not much things : We will now read a embbeded Script and modify is content before execution.

Here's the script added to the project :

$strComputer = "*ComputerName*"
get-wmiobject -class "Win32_LogicalDisk" -namespace "root\cimv2" -computername $strComputer where{$_.DriveType –eq 3}out-string

A classic PowerShell WMI request. As you can see, I put the Machine name as an argument on the first line. I gives an arbitrary name "*ComputerName*" that will let us replace it with the content of the Textbox.

Below is the modified code :


        // On the fly script modification before execution


        StreamReader objReader = new StreamReader(Server.MapPath("~/scripts/WmiAsset.ps1"));
        string strContent = objReader.ReadToEnd();
        strContent = strContent.Replace("*ComputerName*", TxtComputerName.Text);
        this.executePowerShellCode(strContent);


First thing, we will read the PowerShell script file. I put it in a subfolder called "Scripts". We use the SYSTEM.IO library to do this.


StreamReader objReader = new StreamReader(Server.MapPath("~/scripts/WmiAsset.ps1"));

Then we put this script in a string variable and close the StreamReader object:

string strContent = objReader.ReadToEnd();

Now, we call the replace method on this string. Our goal is to replace "*computername*" with the content of the Textbox.


strContent = strContent.Replace("*ComputerName*", TxtComputerName.Text);

The important thing here is to have unique name in the script when you want to do this change (here *computername* is used only once). This is easy to achieve, because you're the Writer of the POwerShell Code ;)

That's the deal, now we execute the PowerShell code as before :


this.executePowerShellCode(strContent);

Nothing really tricky here. If you need to modifiy your request engine, you only need to edit the .PS1 file, no C#/ASP.NET is required (this can be delegate to every administrator that got skills on PowerShell)

You can of course put several parameters in your web form. The limit is your imagination (and business needs, by the way). There's many little things to implement in order to have a "Profesionnal" powershell website (Error handler, better output support...), but you now have the bases to achieve this. Hope you got a better view of PowerShell/ASP.NET interaction.

To finish this tutorial, let's see how to publish the website on IIS.

WebSite deployment

Our main goal is to use a Service Account to execute tasks (here, our scripts). This simplify the rights management process and delegation, cause it's not necessary to gives administrator rights to every user of the website.

We only need to know the identity of the end user and filter website access.

The deployment strategy on IIS is :

First, Filter the website access. Just put appropriate rights on the website folder (put a user group on the folder with read access only).

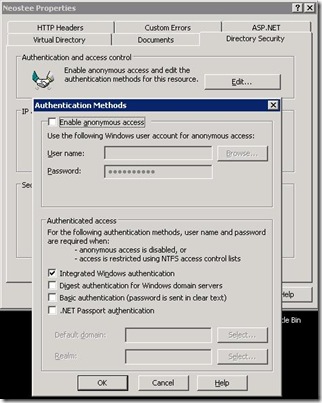
On your IIS server, desactivate the anonymous access, and select "Integrated Windows Authentication"

powerASP5

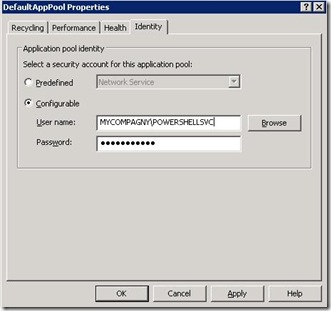
Then create an application pool to delegate the server side code to a service Account. To do this, create a new application pool open it's properties and define "Identity" as shown below :

powerASP6

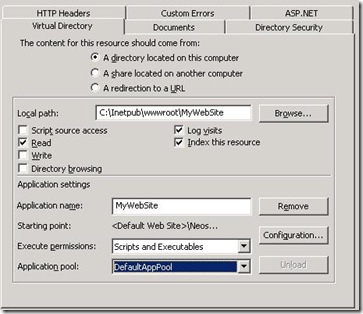
Finally, open your website properties and select the good application pool for it:

PowerASP7

Modify your web.config to use impersonation. Go to the "Authentication mode" line of this file and add the following code :


        <authentication mode="Windows"/>
    <identity impersonate="true"/>

Here you go : your website now use impersonation and access is filtered by NTFS rights.

I hope this little tutorial gives you ideas and inspiration. I well come back soon with another concept with ASP.NET / PowerShell / AJAX and Silverlight !

Here is the source code : PowerShellASP2

PowerShell and ASP.NET Part 2

Reminder : Source code of this sample is available here.

You need the following tools to use it :

WebDevelopper Express Edition

Ajax controls toolkit and library

We will now study this web site topology and codes.

WEB.CONFIG

We start with the easiest thing : our web.config

there's very few modifications : our first objective is to add assemblies references in our project, in order to create runspace and pipeline in the code-behind.

<assemblies> 
    <add assembly="System.Core, Version=3.5.0.0, Culture=neutral, PublicKeyToken=B77A5C561934E089"/> 
    <add assembly="System.Web.Extensions, Version=3.5.0.0, Culture=neutral, PublicKeyToken=31BF3856AD364E35"/> 
    <add assembly="System.Data.DataSetExtensions, Version=3.5.0.0, Culture=neutral, PublicKeyToken=B77A5C561934E089"/> 
    <add assembly="System.Xml.Linq, Version=3.5.0.0, Culture=neutral, PublicKeyToken=B77A5C561934E089"/> 
    <add assembly="System.Management, Version=2.0.0.0, Culture=neutral, PublicKeyToken=B03F5F7F11D50A3A"/> 
    <add assembly="System.Management.Automation, Version=1.0.0.0, Culture=neutral, PublicKeyToken=31BF3856AD364E35"/> 
</assemblies>

That's a cool start, now we will study the user interface !

DEFAULT.ASPX

You can do your design with simple drag and drop of controls (Textbox, Combox, etc...). This is pretty simple. There is a good ASP.NET tutorial here if you want to know more about it.
Let see what are the particularities of this example

UpdatePanel

In the first part of this tutorial, I told you that I used AJAX to :
· Manage a Timer
· Manage refresh of the Output Textbox.
In order to use AJAX extensions in our website project, you need to put a ScriptManager in the .aspx document (this will let you use other AJAX controls)

I put it at the beginning of the form :

<body>
    <form id="form1" runat="server">
    <asp:ScriptManager ID="ScriptManager1" runat="server">
    </asp:ScriptManager>

Next, here is the core interface (I bypass the top informations, not really needed):

<asp:TextBox ID="TxtPowerShellScript" runat="server" TextMode="MultiLine" Width="597px"
            Height="194px" BackColor="#012456" ForeColor="#EEEDF0" Wrap="False"></asp:TextBox>
        <br />
        <asp:UpdatePanel ID="UpdatePanel1" runat="server">
            <ContentTemplate>
                <asp:Button ID="BtnExecuteScript" runat="server" Text="Launch Script" OnClick="BtnExecuteScript_Click" />
                <br />
                Output :
                <br />
                <asp:TextBox ID="TxtResult" runat="server" Height="199px" TextMode="MultiLine" Width="600px"
                    Wrap="False" BackColor="#012456" ForeColor="#EEEDF0"></asp:TextBox>
                <br />
                <asp:Timer ID="Timer1" runat="server" Enabled="False" Interval="100" OnTick="Timer1_Tick" />
            </ContentTemplate>
        </asp:UpdatePanel>
First element is our Input Textbox to write scripts :

<asp:TextBox ID="TxtPowerShellScript" runat="server" TextMode="MultiLine" Width="597px"
          Height="194px" BackColor="#012456" ForeColor="#EEEDF0" Wrap="False"></asp:TextBox>
Nothing special here, I just put some parameters like multiline suspport and colors to match PowerShell console.
Then there is the Execute button and the output Textbox. They are embbeded in a UpdatePanel Control. This control let us refresh only this elements without refreshing the whole page when we'll update content. You can see our Timer too :

<
asp:Timer ID="Timer1" runat="server" Enabled="False" Interval="100" OnTick="Timer1_Tick" />


The Interval parameter (Interval="100") define the refresh rate (milliseconds), the OnTick (OnTick="Timer1_Tick") specify the function called in the code-behind when the Timer refresh. The Timer is desactivated by default (Enabled="False") in order to avoid useless charge on the serve. It's activated only when the Button is clicked.
That's all for the user interface. Except the UpdatePanel (which is only another control from the designer point of view), we are really on a classic webForm design. We will no study the Code-Behind part of the website.

DEFAULT.ASPX.CS

This is the C# Code that will manage our PowerShell execution and the update of the output Textbox.

Let's go from the beginning : At the very top of the code, I just add 3 more instances (all the others are generated by default when you create an asp.NET project website) :


using System.Management.Automation;

using System.Management.Automation.Runspaces;

using System.IO;


System.Management.Automation and .Runspaces are required to create the PowerShell runspace and the Pipeline. System.IO will be use to convert the Input Textbox content as you'll see later.

We'll then first create Runspace and Pipeline object at the beginning of the main class to expose them in all functions.


Runspace runspace = RunspaceFactory.CreateRunspace();
Pipeline pipe;

We will now study the code, beginning from the user interaction : the Click on the Button. The function (line 85) is :


protected void BtnExecuteScript_Click(object sender, EventArgs e)
{
    string strCurrentId = System.Security.Principal.WindowsIdentity.GetCurrent().Name;
    // Enable timer and disable button, clear TxtResult textbox
    this.Timer1.Enabled = true;
    this.BtnExecuteScript.Enabled = false;
    this.TxtResult.Text = "";

    // put the username at the beginning of the output (optional)
    Session["PowerTrace"] = "Initiateur de la demande : " + strCurrentID + "\r\n";

     // Gather script from the TxtPowerShellScript and convert it from html to clean text
    // then call executePowerShellCode function with the result
      string strContent = TxtPowerShellScript.Text;
    StringWriter writer = new StringWriter();
     Server.HtmlDecode(strContent, writer);
    this.executePowerShellCode(writer.ToString());
}
Let's see what happen. First, I create the strCurrentID string that will hold the current user name. This is not mandatory for our example, but this information is interesting to monitor our website activities.
When we'll deploy our site, it's a Service Account that will handle all the code execution. as we want (if it's not the case, you should!) monitor the Site Activities, it's important to know the name of the user who fired an action, in order to know who to blame if something goes wrong :)

System.Security.Principal.WindowsIdentity.GetCurrent().Name gives us this info.

Then we activate the Timer:


this.Timer1.Enabled = true;

We desactivate the button (to avoid unwanted launch of script while another is running):

this.BtnExecuteScript.Enabled = false;


And we reset the Output Textbox :

this.TxtResult.Text = "";


Then we will create our Session Variable that I called "PowerTrace". We feed it first with the name of the user :


Session["PowerTrace"] = "Initiateur de la demande : " + strCurrentID + "\r\n";


Let's go deeper on this point. All our problem here is to pass data from our code behind to the aspx controls (output textbox) when we refresh the page. As these 2 elements are isolated (each has its context : WebForm on the client side, codebehind on the server side), we need a way to put the output of our script in the Output Textbox.

There is several solutions, more or less smart (Create temporary textfile, add output as an URL element...). The Session VAriable is in our context the best and simple way to do this. This let you present datas to the user-side of the website that lives until the user session ends. Without this, when we refresh the page, every informations that are on the server side (variables from the codebehind) will be reset.
As the script output won't takes a lot of Memory and our website is targeted to be an intranet solution for administrators, this is a good choice, easy to setup.

The content of this variable will be exposed until the end of the user session. Now we'll gather the content of the Input Textbox :

string strContent = TxtPowerShellScript.Text;

Problem here : We are in an HTML Context, the content of the Textbox is in HTML format. This won't let us execute the code as is, cause unwanted informations are added ("\r\n" for carraige return...). We can't use this code with PowerShell like this.

We are lucky : there is a method that let us do just that : convert HTML string to standard text string. It's name is HTMLDECODE

This is this method that I use here : I create a StringWriter object (to build string), and use the HTMLDECODE method :


StringWriter writer = new StringWriter()
Server.HtmlDecode(strContent, writer);


Then I call the ExecutePowerShellCode function to execute this code.

this.executePowerShellCode(writer.ToString());

Let's see what's inside this ExecutePowerShellCode function:


private void executePowerShellCode(string code)
{
    runspace.Open();
    pipe = runspace.CreatePipeline(code);
    pipe.Input.Close();

    // Call output_DataReady when data arrived in the pipe
    pipe.Output.DataReady += new EventHandler(Output_DataReady);
    // Call pipe_StateChanged 
    pipe.StateChanged += new EventHandler<PipelineStateEventArgs>(pipe_StateChanged);
    pipe.InvokeAsync();
}

Nothing special, I use a really classic way to execute Powershell code async. You'll find many sample on internet that do just that.

We open a new runspace

runspace.Open();


Then we create a piepline in this runspace, with the code from the Input Textbox

pipe = runspace.CreatePipeline(code);


We close the Pipeline Input

pipe.Input.Close();


We then create a Event manager. It calls the "Output_Dataready" function when something appears in the pipeline output.

pipe.Output.DataReady += new EventHandler(Output_DataReady);

We create another Event manager. It calls the "pipe_StateChanged" function when the state of the pipeline Changed. Here, we test if the pipeline state is "Terminated", wich told us that the script ends. Then we will do some things, like activate the button again (we'll speak of that later)
Finally, we call the "InvokeAsync" method that will execute the pipeline asynchronously.

pipe.InvokeAsync();

Ok, now our code is waiting for activities from the pipeline. We'll now look at the functions "Output_Dataready" when data arrived at the pipeline output .


void Output_DataReady(object sender, EventArgs e)
{
    PipelineReader<PSObject> reader = (PipelineReader<PSObject>)sender;
    String strPowershellTrace = reader.Read().ToString();
    Session["PowerTrace"] += strPowershellTrace + "\r\n";
}

We first read the objects in the pipeline output and put it in a reader object :


PipelineReader<PSObject> reader = (PipelineReader<PSObject>)sender;


Then, we create a string variable wich get the output from the pipeline (script output)

String strPowershellTrace = reader.Read().ToString();

Finally, we add this variable in our Session Variable


Session["PowerTrace"] += strPowershellTrace + "\r\n";

As you can see, I add "\r\n" at the end to handle carriage return in HTML (this output will be in a HTML Textbox). To conclude this part on PowerShell code exectution, let's have a look on the last function when the pipeline state changes.

Here, we put a condition on the pipeline state : if the status is completed, we do some actions, else we do nothing (we only need for the example to test if our script execution is completed)


if (pipe.PipelineStateInfo.State == PipelineState.Completed)


So, what we do here ? First we close the runspace

Runspace.close();

Thens, while our Session Variable isn't null AND there's something in it (Number of caracters greater than zero), we don't do anything. We do this to let time for our Timer to write the Session Variable data in the Output Textbox. We'll see after how and why

while ((Session["PowerTrace"] != null) && (Session["PowerTrace"].ToString().Length > 0))
{
}
runspace.Close();

Our last task is to remove our Session variable and wait for another script :

Session.Remove("PowerTrace");

Let's study the Timer Function :


protected void Timer1_Tick(object sender, EventArgs e)
    {
        if (Session["PowerTrace"] == null)
        {
            this.BtnExecuteScript.Enabled = true;
            Timer1.Enabled = false;
            this.TxtResult.Text += "Fin du script";
        }
        else
        {
            String strPoshTrace = Session["PowerTrace"].ToString();
              this.TxtResult.Text += strPoshTrace;
            Session["PowerTrace"] = "";
        }
    }
This function is called every 100 ms in our case, regardless of the pipeline Events. Here is what we do :
If our Session Variable is null (this happens only after the "remove" in the "Pipe_StateChanged" function), we :
· Activate the button
· Deactivate the Timer
· Write "End of script" in the Output Textbox
this.BtnExecuteScript.Enabled = true;
Timer1.Enabled = false;
this.TxtResult.Text += "Fin du script";
Else we gather the Session variable content in a string

String strPoshTrace = Session["PowerTrace"].ToString();


We add it to the Output Textbox

this.TxtResult.Text += strPoshTrace;


And we empty the Session Variable

Session["PowerTrace"] = "";


Note that we don't remove the Session variable, this will valid the condition in our Pipe_StateChange :


while ((Session["PowerTrace"] != null) && (Session["PowerTrace"].ToString().Length > 0))

This is it, we've finished reviewing the sample code. We will talk in the third and last part of this tutorial about :

· How to manage PowerShell script from a Web Form

· How to deploy this site on a IIS server with appropriate security