Reminder : Source code of this sample is available here.
You need the following tools to use it :
WebDevelopper Express Edition
Ajax controls toolkit and library
We will now study this web site topology and codes.
WEB.CONFIG
We start with the easiest thing : our web.config
there's very few modifications : our first objective is to add assemblies references in our project, in order to create runspace and pipeline in the code-behind.
<assemblies>
<add assembly="System.Core, Version=3.5.0.0, Culture=neutral, PublicKeyToken=B77A5C561934E089"/>
<add assembly="System.Web.Extensions, Version=3.5.0.0, Culture=neutral, PublicKeyToken=31BF3856AD364E35"/>
<add assembly="System.Data.DataSetExtensions, Version=3.5.0.0, Culture=neutral, PublicKeyToken=B77A5C561934E089"/>
<add assembly="System.Xml.Linq, Version=3.5.0.0, Culture=neutral, PublicKeyToken=B77A5C561934E089"/>
<add assembly="System.Management, Version=2.0.0.0, Culture=neutral, PublicKeyToken=B03F5F7F11D50A3A"/>
<add assembly="System.Management.Automation, Version=1.0.0.0, Culture=neutral, PublicKeyToken=31BF3856AD364E35"/>
</assemblies>
That's a cool start, now we will study the user interface !
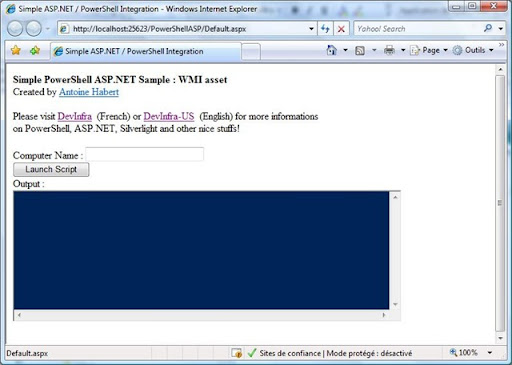
DEFAULT.ASPX
You can do your design with simple drag and drop of controls (Textbox, Combox, etc...). This is pretty simple. There is a good
ASP.NET tutorial here if you want to know more about it.
Let see what are the particularities of this example
UpdatePanel
In the first part of this tutorial, I told you that I used AJAX to :
· Manage a Timer
· Manage refresh of the Output Textbox.
In order to use AJAX extensions in our website project, you need to put a ScriptManager in the .aspx document (this will let you use other AJAX controls)
I put it at the beginning of the form :
<body>
<form id="form1" runat="server">
<asp:ScriptManager ID="ScriptManager1" runat="server">
</asp:ScriptManager>
Next, here is the core interface (I bypass the top informations, not really needed):
<asp:TextBox ID="TxtPowerShellScript" runat="server" TextMode="MultiLine" Width="597px"
Height="194px" BackColor="#012456" ForeColor="#EEEDF0" Wrap="False"></asp:TextBox>
<br />
<asp:UpdatePanel ID="UpdatePanel1" runat="server">
<ContentTemplate>
<asp:Button ID="BtnExecuteScript" runat="server" Text="Launch Script" OnClick="BtnExecuteScript_Click" />
<br />
Output :
<br />
<asp:TextBox ID="TxtResult" runat="server" Height="199px" TextMode="MultiLine" Width="600px"
Wrap="False" BackColor="#012456" ForeColor="#EEEDF0"></asp:TextBox>
<br />
<asp:Timer ID="Timer1" runat="server" Enabled="False" Interval="100" OnTick="Timer1_Tick" />
</ContentTemplate>
</asp:UpdatePanel>
First element is our Input Textbox to write scripts :
<asp:TextBox ID="TxtPowerShellScript" runat="server" TextMode="MultiLine" Width="597px"
Height="194px" BackColor="#012456" ForeColor="#EEEDF0" Wrap="False"></asp:TextBox>
Nothing special here, I just put some parameters like multiline suspport and colors to match PowerShell console.
Then there is the Execute button and the output Textbox. They are embbeded in a UpdatePanel Control. This control let us refresh only this elements without refreshing the whole page when we'll update content. You can see our Timer too :
<asp:Timer ID="Timer1" runat="server" Enabled="False" Interval="100" OnTick="Timer1_Tick" />
The Interval parameter (Interval="100") define the refresh rate (milliseconds), the OnTick (OnTick="Timer1_Tick") specify the function called in the code-behind when the Timer refresh. The Timer is desactivated by default (Enabled="False") in order to avoid useless charge on the serve. It's activated only when the Button is clicked.
That's all for the user interface. Except the UpdatePanel (which is only another control from the designer point of view), we are really on a classic webForm design. We will no study the Code-Behind part of the website.
DEFAULT.ASPX.CS
This is the C# Code that will manage our PowerShell execution and the update of the output Textbox.
Let's go from the beginning : At the very top of the code, I just add 3 more instances (all the others are generated by default when you create an asp.NET project website) :
using System.Management.Automation;
using System.Management.Automation.Runspaces;
using System.IO;
System.Management.Automation and .Runspaces are required to create the PowerShell runspace and the Pipeline. System.IO will be use to convert the Input Textbox content as you'll see later.
We'll then first create Runspace and Pipeline object at the beginning of the main class to expose them in all functions.
Runspace runspace = RunspaceFactory.CreateRunspace();
Pipeline pipe;
We will now study the code, beginning from the user interaction : the Click on the Button. The function (line 85) is :
protected void BtnExecuteScript_Click(object sender, EventArgs e)
{
string strCurrentId = System.Security.Principal.WindowsIdentity.GetCurrent().Name;
// Enable timer and disable button, clear TxtResult textbox
this.Timer1.Enabled = true;
this.BtnExecuteScript.Enabled = false;
this.TxtResult.Text = "";
// put the username at the beginning of the output (optional)
Session["PowerTrace"] = "Initiateur de la demande : " + strCurrentID + "\r\n";
// Gather script from the TxtPowerShellScript and convert it from html to clean text
// then call executePowerShellCode function with the result
string strContent = TxtPowerShellScript.Text;
StringWriter writer = new StringWriter();
Server.HtmlDecode(strContent, writer);
this.executePowerShellCode(writer.ToString());
}
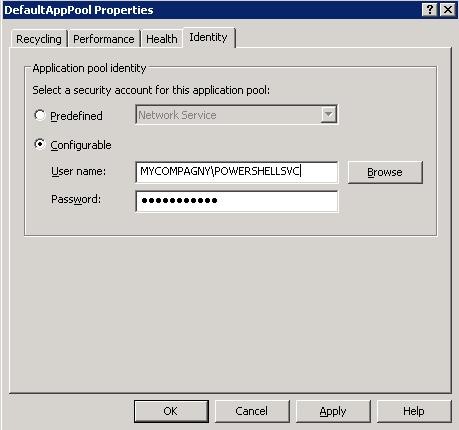
Let's see what happen. First, I create the strCurrentID string that will hold the current user name. This is not mandatory for our example, but this information is interesting to monitor our website activities.
When we'll deploy our site, it's a Service Account that will handle all the code execution. as we want (if it's not the case, you should!) monitor the Site Activities, it's important to know the name of the user who fired an action, in order to know who to blame if something goes wrong :)
System.Security.Principal.WindowsIdentity.GetCurrent().Name gives us this info.
Then we activate the Timer:
this.Timer1.Enabled = true;
We desactivate the button (to avoid unwanted launch of script while another is running):
this.BtnExecuteScript.Enabled = false;
And we reset the Output Textbox :
this.TxtResult.Text = "";
Then we will create our Session Variable that I called "PowerTrace". We feed it first with the name of the user :
Session["PowerTrace"] = "Initiateur de la demande : " + strCurrentID + "\r\n";
Let's go deeper on this point. All our problem here is to pass data from our code behind to the aspx controls (output textbox) when we refresh the page. As these 2 elements are isolated (each has its context : WebForm on the client side, codebehind on the server side), we need a way to put the output of our script in the Output Textbox.
There is several solutions, more or less smart (Create temporary textfile, add output as an URL element...). The Session VAriable is in our context the best and simple way to do this. This let you present datas to the user-side of the website that lives until the user session ends. Without this, when we refresh the page, every informations that are on the server side (variables from the codebehind) will be reset.
As the script output won't takes a lot of Memory and our website is targeted to be an intranet solution for administrators, this is a good choice, easy to setup.
The content of this variable will be exposed until the end of the user session. Now we'll gather the content of the Input Textbox :
string strContent = TxtPowerShellScript.Text;
Problem here : We are in an HTML Context, the content of the Textbox is in HTML format. This won't let us execute the code as is, cause unwanted informations are added ("\r\n" for carraige return...). We can't use this code with PowerShell like this.
We are lucky : there is a method that let us do just that : convert HTML string to standard text string. It's name is HTMLDECODE
This is this method that I use here : I create a StringWriter object (to build string), and use the HTMLDECODE method :
StringWriter writer = new StringWriter()
Server.HtmlDecode(strContent, writer);
Then I call the ExecutePowerShellCode function to execute this code.
this.executePowerShellCode(writer.ToString());
Let's see what's inside this ExecutePowerShellCode function:
private void executePowerShellCode(string code)
{
runspace.Open();
pipe = runspace.CreatePipeline(code);
pipe.Input.Close();
// Call output_DataReady when data arrived in the pipe
pipe.Output.DataReady += new EventHandler(Output_DataReady);
// Call pipe_StateChanged
pipe.StateChanged += new EventHandler<PipelineStateEventArgs>(pipe_StateChanged);
pipe.InvokeAsync();
}
Nothing special, I use a really classic way to execute Powershell code async. You'll find many sample on internet that do just that.
We open a new runspace
Then we create a piepline in this runspace, with the code from the Input Textbox
pipe = runspace.CreatePipeline(code);
We close the Pipeline Input
We then create a Event manager. It calls the "Output_Dataready" function when something appears in the pipeline output.
pipe.Output.DataReady += new EventHandler(Output_DataReady);
We create another Event manager. It calls the "pipe_StateChanged" function when the state of the pipeline Changed. Here, we test if the pipeline state is "Terminated", wich told us that the script ends. Then we will do some things, like activate the button again (we'll speak of that later)
Finally, we call the "InvokeAsync" method that will execute the pipeline asynchronously.
Ok, now our code is waiting for activities from the pipeline. We'll now look at the functions "Output_Dataready" when data arrived at the pipeline output .
void Output_DataReady(object sender, EventArgs e)
{
PipelineReader<PSObject> reader = (PipelineReader<PSObject>)sender;
String strPowershellTrace = reader.Read().ToString();
Session["PowerTrace"] += strPowershellTrace + "\r\n";
}
We first read the objects in the pipeline output and put it in a reader object :
PipelineReader<PSObject> reader = (PipelineReader<PSObject>)sender;
Then, we create a string variable wich get the output from the pipeline (script output)
String strPowershellTrace = reader.Read().ToString();
Finally, we add this variable in our Session Variable
Session["PowerTrace"] += strPowershellTrace + "\r\n";
As you can see, I add "\r\n" at the end to handle carriage return in HTML (this output will be in a HTML Textbox). To conclude this part on PowerShell code exectution, let's have a look on the last function when the pipeline state changes.
Here, we put a condition on the pipeline state : if the status is completed, we do some actions, else we do nothing (we only need for the example to test if our script execution is completed)
if (pipe.PipelineStateInfo.State == PipelineState.Completed)
…
So, what we do here ? First we close the runspace
Runspace.close();
Thens, while our Session Variable isn't null AND there's something in it (Number of caracters greater than zero), we don't do anything. We do this to let time for our Timer to write the Session Variable data in the Output Textbox. We'll see after how and why
while ((Session["PowerTrace"] != null) && (Session["PowerTrace"].ToString().Length > 0))
{
}
runspace.Close();
Our last task is to remove our Session variable and wait for another script :
Session.Remove("PowerTrace");Let's study the Timer Function :
protected void Timer1_Tick(object sender, EventArgs e)
{
if (Session["PowerTrace"] == null)
{
this.BtnExecuteScript.Enabled = true;
Timer1.Enabled = false;
this.TxtResult.Text += "Fin du script";
}
else
{
String strPoshTrace = Session["PowerTrace"].ToString();
this.TxtResult.Text += strPoshTrace;
Session["PowerTrace"] = "";
}
}
This function is called every 100 ms in our case, regardless of the pipeline Events. Here is what we do :
If our Session Variable is null (this happens only after the "remove" in the "Pipe_StateChanged" function), we :
· Activate the button
· Deactivate the Timer
· Write "End of script" in the Output Textbox
this.BtnExecuteScript.Enabled =
true;
Timer1.Enabled = false;
this.TxtResult.Text += "Fin du script";
Else we gather the Session variable content in a string
String strPoshTrace = Session["PowerTrace"].ToString();
We add it to the Output Textbox
this.TxtResult.Text += strPoshTrace;
And we empty the Session Variable
Session["PowerTrace"] = "";
Note that we don't remove the Session variable, this will valid the condition in our Pipe_StateChange :
while ((Session["PowerTrace"] != null) && (Session["PowerTrace"].ToString().Length > 0))
This is it, we've finished reviewing the sample code. We will talk in the third and last part of this tutorial about :
· How to manage PowerShell script from a Web Form
· How to deploy this site on a IIS server with appropriate security


