mardi 7 février 2012
PowerShell GUI Designer: add some GUI to your scripts

vendredi 22 juillet 2011
PowerWPF: PowerShell WPF project template
lundi 14 février 2011
Using PowerShell 2.0 from ASP.NET Part 1
In this post, you’ll find a step-by-step guide on PowerShell 2.0 integration in an ASP.NET project.
I want to show you here the most basic sample possible, we’ll extend this in the following post on this subject.
This sample targets PowerShell 2.0 with IIS 7.0, but it should work on IIS 6.0. also. You can use an Express version of visual studio.
Ok, let’s get started !
Project setup
Open Visual Studio, choose File> New > Project
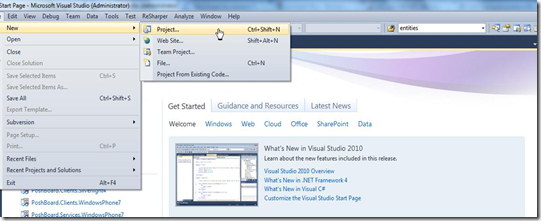
Choose Web Project > ASP.NET Web Application. Target any framework from 2.0 to 4.0 (this example was build targeting .NET 4.0)
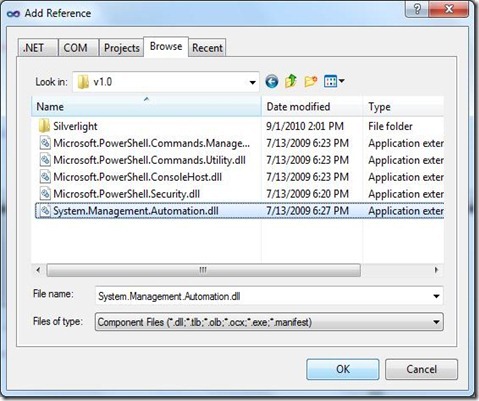
Then we’ll add a reference to the PowerShell assembly called “System.Management.Automation”. Right click on References, choose “Add reference..”
Go to :
C:\Program Files (x86)\Reference Assemblies\Microsoft\WindowsPowerShell\v1.0
or
C:\Program Files\Reference Assemblies\Microsoft\WindowsPowerShell\v1.0
For a x86 OS.
Now we can start building our GUI.
Create the GUI
our GUI will be straight-forward : a textbox for PowerShell code, an execute button and a result textbox :
Here’s the ASP.NET code for our default.aspx page
1: <%@ Page Language="C#" AutoEventWireup="true" CodeBehind="Default.aspx.cs" Inherits="PowerShellCall._Default" %>
2: 3: <!DOCTYPE html PUBLIC "-//W3C//DTD XHTML 1.0 Transitional//EN" "http://www.w3.org/TR/xhtml1/DTD/xhtml1-transitional.dtd">
4: 5: <html xmlns="http://www.w3.org/1999/xhtml">
6: <head runat="server">
7: <title></title>
8: </head>
9: <body>
10: 11: <form id="form1" runat="server">
12: <center>
13: <div>
14: <table>
15: <tr><td><h1>PowerShell Test</h1></td></tr>
16: <tr><td><h3>PowerShell Code</h3></td></tr>
17: 18: <tr><td>
19: <asp:TextBox ID="PowerShellCodeBox" runat="server" TextMode="MultiLine" Width=700 Height=100></asp:TextBox>
20: </td></tr>
21: 22: <tr><td>
23: <asp:Button ID="ExecuteCode" runat="server" Text="Execute" Width=200 onclick="ExecuteCode_Click"
24: />
25: </td></tr>
26: 27: <tr><td><h3>Result</h3></td></tr>
28: 29: <tr><td>
30: <asp:TextBox ID="ResultBox" TextMode="MultiLine" Width=700 Height=200 runat="server"></asp:TextBox>
31: </td></tr>
32: </table>
33: </div>
34: </center>
35: </form>
36: 37: </body>
38: </html>
Our goal: when the user click on “Execute”, we want to launch the PowerShell code in the upper textbox and display script result on the bottom textbox.
Let’s have a look to the code behind of our default.aspx page.
Calling PowerShell 2.0 from Code-behind
As you can see on the aspx page, we have an “onclick” method on our button. You’ll find an onclick method defined in the .cs file that will be called when we click on the button (ExecuteCode_Click)
1: protected void ExecuteCode_Click(object sender, EventArgs e)
2: {3: // Clean the Result TextBox
4: ResultBox.Text = string.Empty;
5: 6: // Initialize PowerShell engine
7: var shell = PowerShell.Create(); 8: 9: // Add the script to the PowerShell object
10: shell.Commands.AddScript(PowerShellCodeBox.Text); 11: 12: // Execute the script
13: var results = shell.Invoke(); 14: 15: // display results, with BaseObject converted to string
16: // Note : use |out-string for console-like output
17: if (results.Count > 0)
18: {19: // We use a string builder ton create our result text
20: var builder = new StringBuilder();
21: 22: foreach (var psObject in results)
23: {24: // Convert the Base Object to a string and append it to the string builder.
25: // Add \r\n for line breaks
26: builder.Append(psObject.BaseObject.ToString() + "\r\n");
27: } 28: 29: // Encode the string in HTML (prevent security issue with 'dangerous' caracters like < >
30: ResultBox.Text = Server.HtmlEncode(builder.ToString()); 31: } 32: 33: }Execution of PowerShell code is really simple in C#, we only need to follow these steps :
update : updated the code, we don't need runspace creation in this scenario, already available. (thanks to Oisin). Added string builder and html encoding to prevent security warning when displaying some characters.
1) Create a PowerShell Object
This object let us create pipeline, collect result /errors and so on.
2) Add the script
Here we add our script to our PowerShell object
3) Execute script
At last, we call the Invoke() Method to execute our command in a pipeline. This method returns a collection of PSObject.
4) Display result
Then, we browse this PSObject collection to display the result. Note that we call the “BaseObject” property of each PSObject, this property hold the original object that was decorated in the PSObject object.
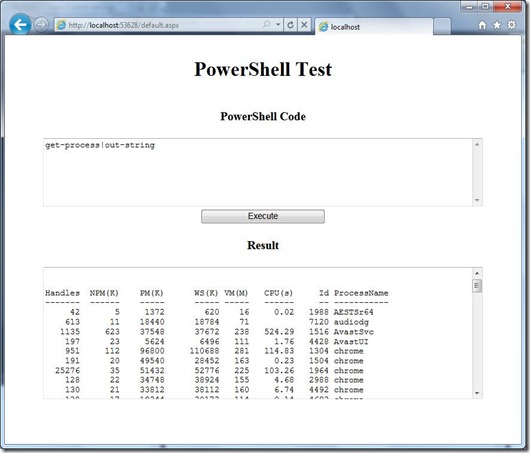
That’s it ! now if you build this project, you should be able to display the result of your script in the result TextBox.
Now we’ll see how to publish this website, and how to specify a specific account for execution.
Website publication
Now that we have a working sample, we’ll publish this website in IIS and specify a custom identity for code execution.
Go to Build > Publish
Choose a target location (Inetpub/wwwroot is the default repository folder for IIS, but you can publish your website in any directory, as long as you set up access rights properly)
After that, open IIS management console, right click on the default web site and select “Add Application”
Note : you can also create a new website on your IIS server or delete the default website to create your own. Creating an application let you access your Website by it’s name like this : http://localhost/MyApplication
Gives a name to your application or website, then click “OK”
Now your application is ready, we’ll now choose a custom identity for our website. This identity will be used to execute your PowerShell scripts. There are many ways to set identity for a website, we’ll cover in this first post the most basic ones.
Anonymous authentication
This method is the easiest. We’ll define an anonymous authentication to our website, and choose a custom identity to run our commands. This is easy, but with severe drawbacks :
Anyone can access our website and will execute commands with the identity provided (we can mitigate this with specific access rights on the website folder, but this is clearly not the most secured method, you’re warned !)
Select your application, then click on the “Authentication” icon
Right click on “anonymous authentication” and select “Activate”, then Edit…
Choose “Specific "User”, click Set
Then fill your service account identity
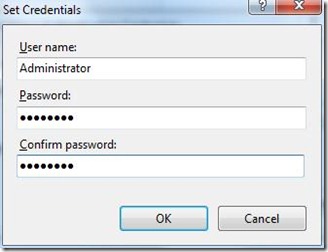
That’s it : your code will be executed with this identity, regardless of the identity of the user.
Application Pool Identity
In more evolved scenarii, we can disable anonymous authentication and still use a custom identity for our website execution. This identity is set in an “Application Pool”.
Application Pools can be seen as an execution context for a website/web application (I make it short here), we won’t go in the details, but there’s many interesting features behind the application pool concept. One is to be able to set windows integrated authentication to authenticate user and use the application pool identity to run our code.
Note: we can set an Application pool and still use anonymous authentication, in the previous screen you have the option to use the application pool identity for your anonymous connection.
We’ll now setup our dedicated application pool for our test project.
First, double click on “Application Pools” in the IIS console, and select “Add Application Pool”
Name your application pool, choose the appropriate Framework and click “OK” (you can leave the managed pipeline mode as-is)
Select your application pool, click on the “Advanced Settings” menu
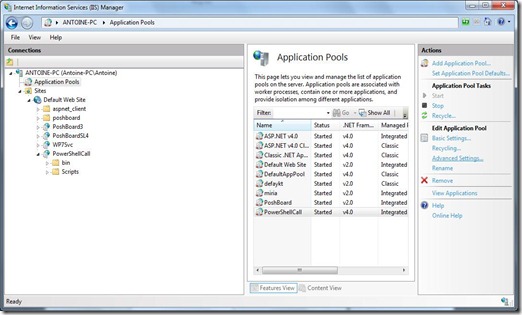
Select Identity and click on the “…” button
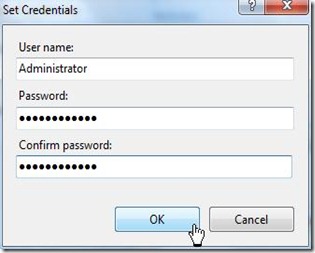
Choose “Custom Account”, click on “Set…”Fill the form with your service account infos, then click ok.
Click on your website and choose “Basic Settings”
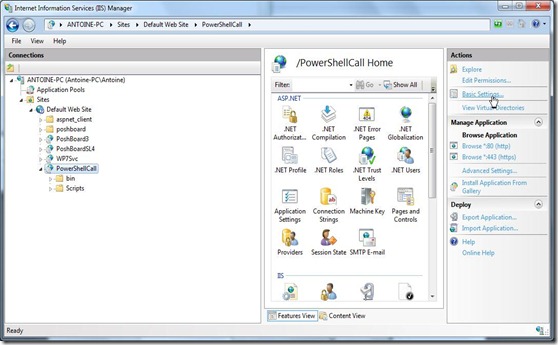
Click on “Select” and choose your new application pool
If everything went fine, you should be able to display the current service account identity :
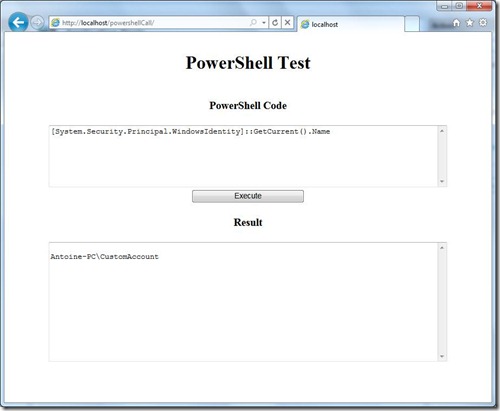
source can be downloaded here :
In the next post, we’ll see how to authenticate our website users and use ASP.NET forms data to configure our PowerShell script.
mardi 30 décembre 2008
PoshBoard v0.3.5 Released ! Compatible with Silverlight 2.0 Final
- -PoshBoard is now fully compatible with silverlight 2.0 Final
- -Updated to last version of AgDatagrid (December 2008 release) and visifire (2.0.5 Beta)
- -BugFix in datagrid generation
- -New edit feature for visifire charts : you can now select the type of charts and define Charts name in the Edit Section.
- -The user guide is updated with last information to ease your installation : read it carefully
mercredi 10 septembre 2008
PowerShellPlus Profesionnal for free ? listen to PowerScripting Podcast !
lundi 25 août 2008
PoshBoard 0.3 is out !
Coding can be really, really fun ! all is getting nicely and I'm pleased to present you the version 0.3.0 of PoshBoard on Codeplex.

What's New ?
- Based on Dropthings 1.7.0 : database is now included in the project, using SQL 2005 Express is now easy !
- Added a Silverlight Datagrid widget
- Added a DevExpress AgDatagrid widget (great open source silverlight control)
- Added PowerShell standard output
What's missing ?
...there's some nice surprises coming soon, stay tuned to my blog for more info !
How to use it ?
(Updated) now a user guide is available at codeplex ! Read it to learn how tu install/configure the website or Visual studio project (with visual and visual express), and how to use the widgets !
mercredi 30 juillet 2008
PoshBoard second video : Adding DataGrid to the mix !
Here is a second video on PoshBoard, my open source IT web portal project. In this one you'll find some news on the upcoming 0.3 version of Poshboard (available here soon at codeplex) :
PoshBoard 2nd video : new widgets, new Dropthings GUI... from pilosite on Vimeo.
New widgets
- Silverlight DataGrid : a direct path from Powershell to Silverlight 2 Datagrid
- AgDatagrid from Developper Express : see how good a pro Silverlight Datagrid can be (Oh, it's free and open source... Great !)
- PowerShell standard Output : launch PowerShell script and get console output.
New front-end :
Discover the brand new dropthings version used in PoshBoard : custom columns layouts in action, new GUI... Dropthings is definitely an impressive Ajax/ASP.NET project !
A tutorial is coming explaining everything about PoshBoard (how to install It ? prerequisite for publishing ? Visual Studio configuration ? )
Feel free to ask questions in the comments, and please don't hesitate to use Issue tracker / discussion in Codeplex to help me improve PoshBoard !
vendredi 18 juillet 2008
PoshBoard and DevInfra in the Last PowerShell Podcast (33)
Episode 33 – Cage Match: PowerScripting vs. Quest
jeudi 10 juillet 2008
Poshboard preview available !
lundi 7 juillet 2008
PowerShell Dashboard : ASP.NET, Silverlight and PowerShell in a shaker !
Here's a little video of my "coming soon" open source project called "PowerShell Dashboard" (PoshBoard for friends). This project will be available soon on the open source forge of my company Octo Technology.
This will let you easely build infrastructure dashboards without the need to code in ASP.NET / AJAX / C# or other compiled language :
All you need to have is imagination.
;)
For this first teaser, I show you a first widget to generate Silverlight charts directly fom PowerShell scripts. I've used Chart generation (Column, pie...) with the great Silverlight charting library VISIFIRE (free and open source too)
PowerShell Dashboard Web Portal Presentation from pilosite on Vimeo.
You can also click here and select full screen. Last but not least, you can also directly download it from this link !
Oh, by the way, forgive my exotic english, hope you'll understand everything, I try to do my best ! :)
lundi 26 mai 2008
PowerShell and ASP.NET Part 3
This is the third and last part of this little Tutorial on PowerShell and ASP.NET.
We will discuss about managing script from a webform and how to deploy this website on a IIS server.
Manage script
We saw previously how to execute PowerShell code from a Textbox. We will now learn how to manage on-the-fly changes on a prebuild PowerShell script.
This is a good method when you want, for example, create à provisioning or audit web portal. User won't write directly PowerShell code, but will fill a form that will then call a script with arguments.
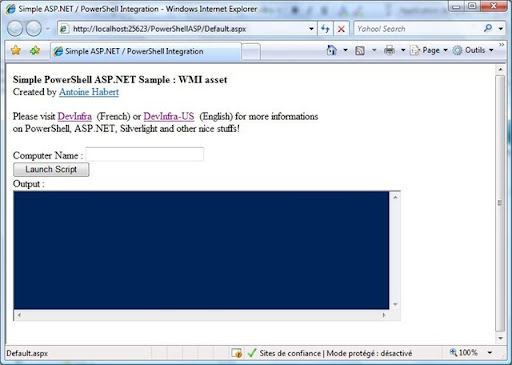
To illustrate this, here is another example with a WMI request engine that takes a machine name as parameter. I slightly modified our former example : I added a Textbox to put a machine Name :
Let's see what changed in our code. Ny the way, not much things : We will now read a embbeded Script and modify is content before execution.
Here's the script added to the project :
$strComputer = "*ComputerName*"get-wmiobject -class "Win32_LogicalDisk" -namespace "root\cimv2" -computername $strComputer where{$_.DriveType –eq 3}out-string
A classic PowerShell WMI request. As you can see, I put the Machine name as an argument on the first line. I gives an arbitrary name "*ComputerName*" that will let us replace it with the content of the Textbox.
Below is the modified code :
// On the fly script modification before executionStreamReader objReader = new StreamReader(Server.MapPath("~/scripts/WmiAsset.ps1"));
string strContent = objReader.ReadToEnd(); strContent = strContent.Replace("*ComputerName*", TxtComputerName.Text); this.executePowerShellCode(strContent);First thing, we will read the PowerShell script file. I put it in a subfolder called "Scripts". We use the SYSTEM.IO library to do this.
StreamReader objReader = new StreamReader(Server.MapPath("~/scripts/WmiAsset.ps1"));
string strContent = objReader.ReadToEnd();Now, we call the replace method on this string. Our goal is to replace "*computername*" with the content of the Textbox.
strContent = strContent.Replace("*ComputerName*", TxtComputerName.Text);The important thing here is to have unique name in the script when you want to do this change (here *computername* is used only once). This is easy to achieve, because you're the Writer of the POwerShell Code ;)
That's the deal, now we execute the PowerShell code as before :
this.executePowerShellCode(strContent);Nothing really tricky here. If you need to modifiy your request engine, you only need to edit the .PS1 file, no C#/ASP.NET is required (this can be delegate to every administrator that got skills on PowerShell)
You can of course put several parameters in your web form. The limit is your imagination (and business needs, by the way). There's many little things to implement in order to have a "Profesionnal" powershell website (Error handler, better output support...), but you now have the bases to achieve this. Hope you got a better view of PowerShell/ASP.NET interaction.
To finish this tutorial, let's see how to publish the website on IIS.
WebSite deployment
Our main goal is to use a Service Account to execute tasks (here, our scripts). This simplify the rights management process and delegation, cause it's not necessary to gives administrator rights to every user of the website.
We only need to know the identity of the end user and filter website access.
The deployment strategy on IIS is :
First, Filter the website access. Just put appropriate rights on the website folder (put a user group on the folder with read access only).
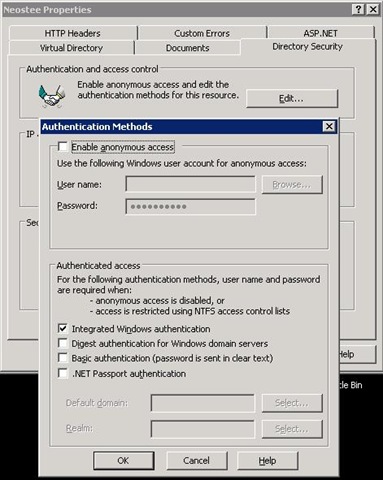
On your IIS server, desactivate the anonymous access, and select "Integrated Windows Authentication"
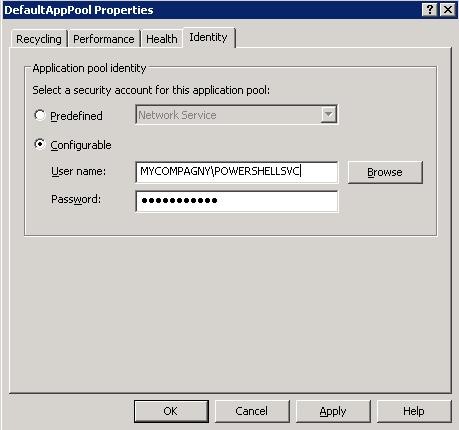
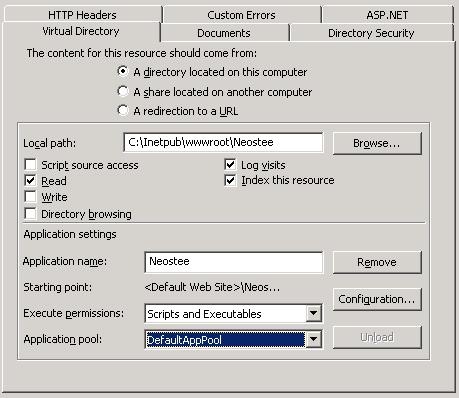
Then create an application pool to delegate the server side code to a service Account. To do this, create a new application pool open it's properties and define "Identity" as shown below :
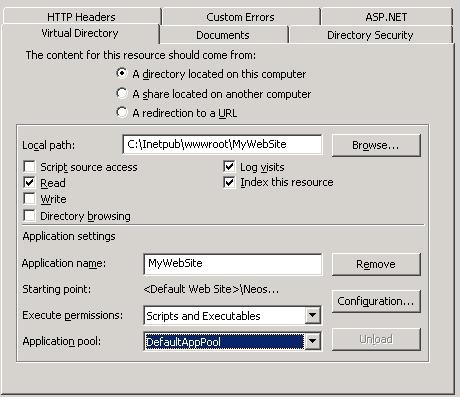
Finally, open your website properties and select the good application pool for it:
Modify your web.config to use impersonation. Go to the "Authentication mode" line of this file and add the following code :
<authentication mode="Windows"/>
<identity impersonate="true"/>
Here you go : your website now use impersonation and access is filtered by NTFS rights.
I hope this little tutorial gives you ideas and inspiration. I well come back soon with another concept with ASP.NET / PowerShell / AJAX and Silverlight !
Here is the source code : PowerShellASP2