This is the third and last part of this little Tutorial on PowerShell and ASP.NET.
We will discuss about managing script from a webform and how to deploy this website on a IIS server.
Manage script
We saw previously how to execute PowerShell code from a Textbox. We will now learn how to manage on-the-fly changes on a prebuild PowerShell script.
This is a good method when you want, for example, create à provisioning or audit web portal. User won't write directly PowerShell code, but will fill a form that will then call a script with arguments.
To illustrate this, here is another example with a WMI request engine that takes a machine name as parameter. I slightly modified our former example : I added a Textbox to put a machine Name :
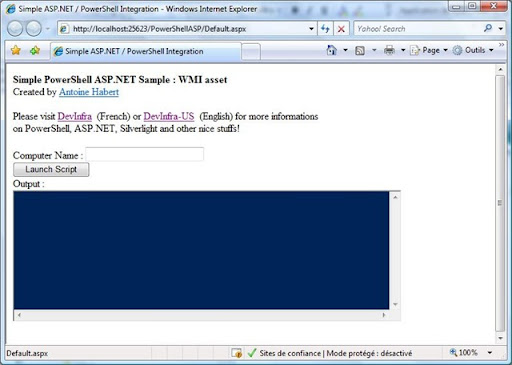
Let's see what changed in our code. Ny the way, not much things : We will now read a embbeded Script and modify is content before execution.
Here's the script added to the project :
$strComputer = "*ComputerName*"get-wmiobject -class "Win32_LogicalDisk" -namespace "root\cimv2" -computername $strComputer where{$_.DriveType –eq 3}out-string
A classic PowerShell WMI request. As you can see, I put the Machine name as an argument on the first line. I gives an arbitrary name "*ComputerName*" that will let us replace it with the content of the Textbox.
Below is the modified code :
// On the fly script modification before executionStreamReader objReader = new StreamReader(Server.MapPath("~/scripts/WmiAsset.ps1"));
string strContent = objReader.ReadToEnd(); strContent = strContent.Replace("*ComputerName*", TxtComputerName.Text); this.executePowerShellCode(strContent);First thing, we will read the PowerShell script file. I put it in a subfolder called "Scripts". We use the SYSTEM.IO library to do this.
StreamReader objReader = new StreamReader(Server.MapPath("~/scripts/WmiAsset.ps1"));
string strContent = objReader.ReadToEnd();Now, we call the replace method on this string. Our goal is to replace "*computername*" with the content of the Textbox.
strContent = strContent.Replace("*ComputerName*", TxtComputerName.Text);The important thing here is to have unique name in the script when you want to do this change (here *computername* is used only once). This is easy to achieve, because you're the Writer of the POwerShell Code ;)
That's the deal, now we execute the PowerShell code as before :
this.executePowerShellCode(strContent);Nothing really tricky here. If you need to modifiy your request engine, you only need to edit the .PS1 file, no C#/ASP.NET is required (this can be delegate to every administrator that got skills on PowerShell)
You can of course put several parameters in your web form. The limit is your imagination (and business needs, by the way). There's many little things to implement in order to have a "Profesionnal" powershell website (Error handler, better output support...), but you now have the bases to achieve this. Hope you got a better view of PowerShell/ASP.NET interaction.
To finish this tutorial, let's see how to publish the website on IIS.
WebSite deployment
Our main goal is to use a Service Account to execute tasks (here, our scripts). This simplify the rights management process and delegation, cause it's not necessary to gives administrator rights to every user of the website.
We only need to know the identity of the end user and filter website access.
The deployment strategy on IIS is :
First, Filter the website access. Just put appropriate rights on the website folder (put a user group on the folder with read access only).
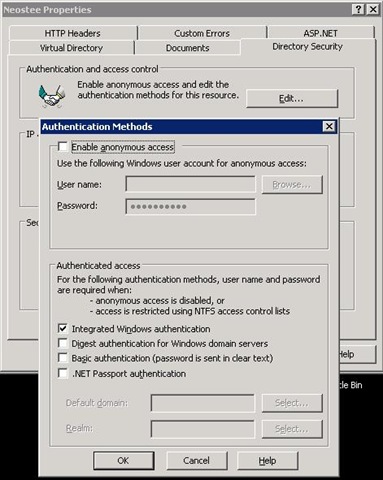
On your IIS server, desactivate the anonymous access, and select "Integrated Windows Authentication"
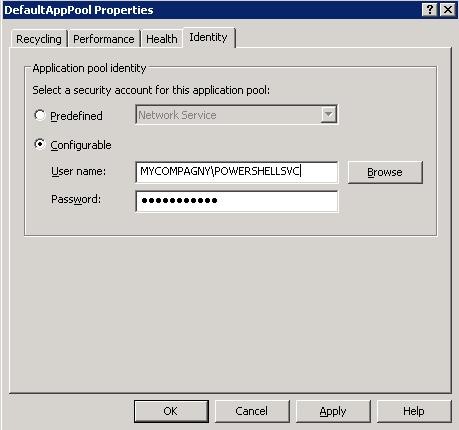
Then create an application pool to delegate the server side code to a service Account. To do this, create a new application pool open it's properties and define "Identity" as shown below :
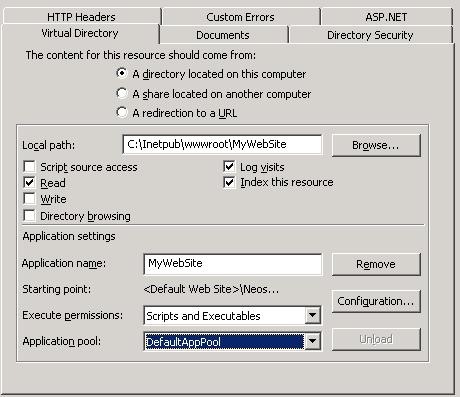
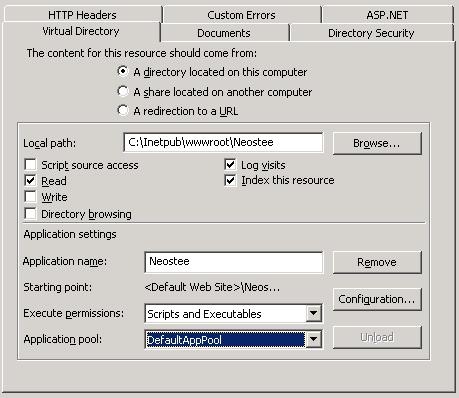
Finally, open your website properties and select the good application pool for it:
Modify your web.config to use impersonation. Go to the "Authentication mode" line of this file and add the following code :
<authentication mode="Windows"/>
<identity impersonate="true"/>
Here you go : your website now use impersonation and access is filtered by NTFS rights.
I hope this little tutorial gives you ideas and inspiration. I well come back soon with another concept with ASP.NET / PowerShell / AJAX and Silverlight !
Here is the source code : PowerShellASP2


2 commentaires:
Antoine Habert - This script is genius. I am going to create an article highlighting the use of this with common troubleshooting for helpdesk and system administrators. Great work!
http://www.bittangents.com/
-Brenton Blawat
Hi Brenton,
Thanks !Glad you like it, feel free to enhance it, sends me the link so I can share the link here.
FYI I've started to update this series to PowerShell 2.0 Api, you can find it here :
http://devinfra-us.blogspot.fr/2011/02/using-powershell-20-from-aspnet-part-1.html
Enregistrer un commentaire