In this post, you’ll find a step-by-step guide on PowerShell 2.0 integration in an ASP.NET project.
I want to show you here the most basic sample possible, we’ll extend this in the following post on this subject.
This sample targets PowerShell 2.0 with IIS 7.0, but it should work on IIS 6.0. also. You can use an Express version of visual studio.
Ok, let’s get started !
Project setup
Open Visual Studio, choose File> New > Project
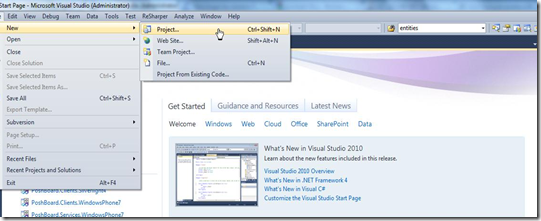
Choose Web Project > ASP.NET Web Application. Target any framework from 2.0 to 4.0 (this example was build targeting .NET 4.0)

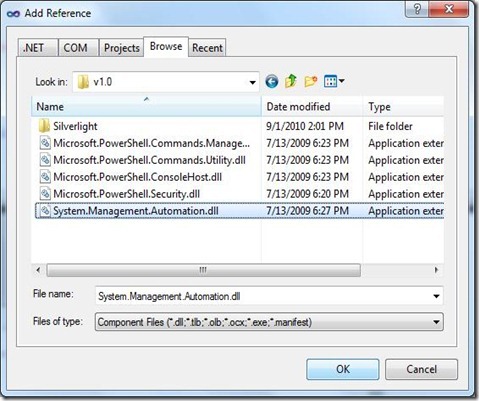
Then we’ll add a reference to the PowerShell assembly called “System.Management.Automation”. Right click on References, choose “Add reference..”

Go to :
C:\Program Files (x86)\Reference Assemblies\Microsoft\WindowsPowerShell\v1.0
or
C:\Program Files\Reference Assemblies\Microsoft\WindowsPowerShell\v1.0
For a x86 OS.
Now we can start building our GUI.
Create the GUI
our GUI will be straight-forward : a textbox for PowerShell code, an execute button and a result textbox :

Here’s the ASP.NET code for our default.aspx page
1: <%@ Page Language="C#" AutoEventWireup="true" CodeBehind="Default.aspx.cs" Inherits="PowerShellCall._Default" %>
2:
3: <!DOCTYPE html PUBLIC "-//W3C//DTD XHTML 1.0 Transitional//EN" "http://www.w3.org/TR/xhtml1/DTD/xhtml1-transitional.dtd">
4:
5: <html xmlns="http://www.w3.org/1999/xhtml">
6: <head runat="server">
7: <title></title>
8: </head>
9: <body>
10:
11: <form id="form1" runat="server">
12: <center>
13: <div>
14: <table>
15: <tr><td><h1>PowerShell Test</h1></td></tr>
16: <tr><td><h3>PowerShell Code</h3></td></tr>
17:
18: <tr><td>
19: <asp:TextBox ID="PowerShellCodeBox" runat="server" TextMode="MultiLine" Width=700 Height=100></asp:TextBox>
20: </td></tr>
21:
22: <tr><td>
23: <asp:Button ID="ExecuteCode" runat="server" Text="Execute" Width=200 onclick="ExecuteCode_Click"
24: />
25: </td></tr>
26:
27: <tr><td><h3>Result</h3></td></tr>
28:
29: <tr><td>
30: <asp:TextBox ID="ResultBox" TextMode="MultiLine" Width=700 Height=200 runat="server"></asp:TextBox>
31: </td></tr>
32: </table>
33: </div>
34: </center>
35: </form>
36:
37: </body>
38: </html>
Our goal: when the user click on “Execute”, we want to launch the PowerShell code in the upper textbox and display script result on the bottom textbox.
Let’s have a look to the code behind of our default.aspx page.
Calling PowerShell 2.0 from Code-behind
As you can see on the aspx page, we have an “onclick” method on our button. You’ll find an onclick method defined in the .cs file that will be called when we click on the button (ExecuteCode_Click)
1: protected void ExecuteCode_Click(object sender, EventArgs e)
2: { 3: // Clean the Result TextBox
4: ResultBox.Text = string.Empty;
5:
6: // Initialize PowerShell engine
7: var shell = PowerShell.Create();
8:
9: // Add the script to the PowerShell object
10: shell.Commands.AddScript(PowerShellCodeBox.Text);
11:
12: // Execute the script
13: var results = shell.Invoke();
14:
15: // display results, with BaseObject converted to string
16: // Note : use |out-string for console-like output
17: if (results.Count > 0)
18: { 19: // We use a string builder ton create our result text
20: var builder = new StringBuilder();
21:
22: foreach (var psObject in results)
23: { 24: // Convert the Base Object to a string and append it to the string builder.
25: // Add \r\n for line breaks
26: builder.Append(psObject.BaseObject.ToString() + "\r\n");
27: }
28:
29: // Encode the string in HTML (prevent security issue with 'dangerous' caracters like < >
30: ResultBox.Text = Server.HtmlEncode(builder.ToString());
31: }
32:
33: }
Execution of PowerShell code is really simple in C#, we only need to follow these steps :
update : updated the code, we don't need runspace creation in this scenario, already available. (thanks to Oisin). Added string builder and html encoding to prevent security warning when displaying some characters.
1) Create a PowerShell Object
This object let us create pipeline, collect result /errors and so on.
2) Add the script
Here we add our script to our PowerShell object
3) Execute script
At last, we call the Invoke() Method to execute our command in a pipeline. This method returns a collection of PSObject.
4) Display result
Then, we browse this PSObject collection to display the result. Note that we call the “BaseObject” property of each PSObject, this property hold the original object that was decorated in the PSObject object.
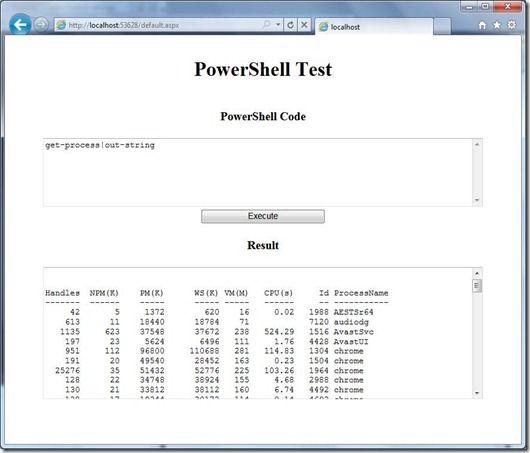
That’s it ! now if you build this project, you should be able to display the result of your script in the result TextBox.
Now we’ll see how to publish this website, and how to specify a specific account for execution.
Website publication
Now that we have a working sample, we’ll publish this website in IIS and specify a custom identity for code execution.
Go to Build > Publish

Choose a target location (Inetpub/wwwroot is the default repository folder for IIS, but you can publish your website in any directory, as long as you set up access rights properly)

After that, open IIS management console, right click on the default web site and select “Add Application”
Note : you can also create a new website on your IIS server or delete the default website to create your own. Creating an application let you access your Website by it’s name like this : http://localhost/MyApplication

Gives a name to your application or website, then click “OK”

Now your application is ready, we’ll now choose a custom identity for our website. This identity will be used to execute your PowerShell scripts. There are many ways to set identity for a website, we’ll cover in this first post the most basic ones.
Anonymous authentication
This method is the easiest. We’ll define an anonymous authentication to our website, and choose a custom identity to run our commands. This is easy, but with severe drawbacks :
Anyone can access our website and will execute commands with the identity provided (we can mitigate this with specific access rights on the website folder, but this is clearly not the most secured method, you’re warned !)
Select your application, then click on the “Authentication” icon

Right click on “anonymous authentication” and select “Activate”, then Edit…

Choose “Specific "User”, click Set
Then fill your service account identity
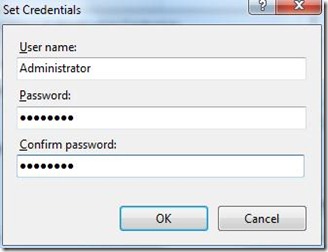
That’s it : your code will be executed with this identity, regardless of the identity of the user.
Application Pool Identity
In more evolved scenarii, we can disable anonymous authentication and still use a custom identity for our website execution. This identity is set in an “Application Pool”.
Application Pools can be seen as an execution context for a website/web application (I make it short here), we won’t go in the details, but there’s many interesting features behind the application pool concept. One is to be able to set windows integrated authentication to authenticate user and use the application pool identity to run our code.
Note: we can set an Application pool and still use anonymous authentication, in the previous screen you have the option to use the application pool identity for your anonymous connection.
We’ll now setup our dedicated application pool for our test project.
First, double click on “Application Pools” in the IIS console, and select “Add Application Pool”

Name your application pool, choose the appropriate Framework and click “OK” (you can leave the managed pipeline mode as-is)

Select your application pool, click on the “Advanced Settings” menu
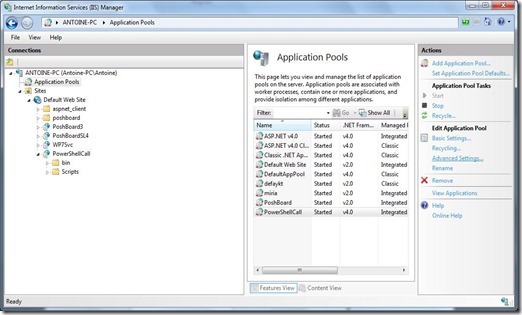
Select Identity and click on the “…” button

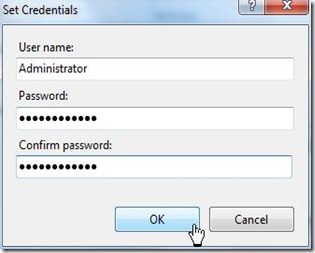
Choose “Custom Account”, click on “Set…”

Fill the form with your service account infos, then click ok.
Click on your website and choose “Basic Settings”
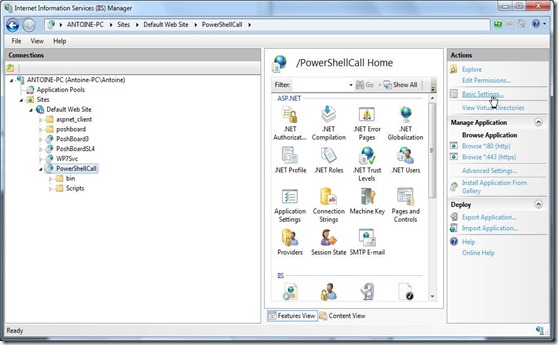
Click on “Select” and choose your new application pool

If everything went fine, you should be able to display the current service account identity :
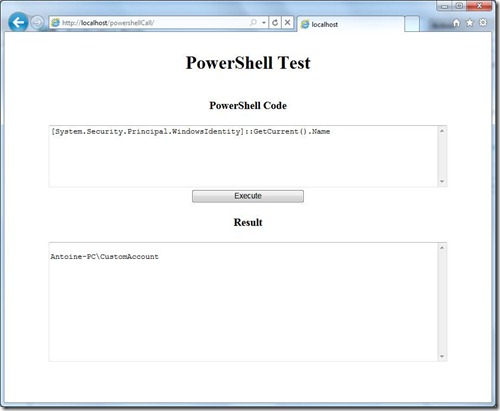
source can be downloaded here :
In the next post, we’ll see how to authenticate our website users and use ASP.NET forms data to configure our PowerShell script.


![clip_image002[5]](https://blogger.googleusercontent.com/img/b/R29vZ2xl/AVvXsEhWS9mcmEyWx1wvTL0-73qi7SjcPdaqMe2q2tBXvMXEUTrrAmaQbhQOERr5-46x_EUS3IAw28hni_R4l1OyrAcCFO5TRm99R2mBvgbBo0n-I5fO5R1nCySOzgLxenoe75XC5RVCjJ1JInc/s1600-h/clip_image002%5B5%5D%5B4%5D.gif "clip_image002[5]")
![clip_image002[10]](https://blogger.googleusercontent.com/img/b/R29vZ2xl/AVvXsEj9VU1YhW2aQvlfnHwbrvhyuu-33VXM2EwA6NFoLuZCy32TYryMKdrfC05xztZVwQ93OWaefcJ2mnowznFmNJOJ6I15Lt9Tx3Cjy55Xq8PweGIOtz8ihy7B9S3ZXbW6jb09F9POAw631_Y/s1600-h/clip_image002%5B10%5D%5B7%5D.jpg "clip_image002[10]")


![clip_image006[2]](https://blogger.googleusercontent.com/img/b/R29vZ2xl/AVvXsEgxPciKyPS0jUC2qK4onhhA7v_ram_-bw-OI9e3eevCmQZCiJEnydEzQFLU9syQdG04jh20KfpmKj0kiD7yimVGW0ooCNx7Sf1EAVTQMatgEM2L-HL-DnDX70l5rx5Uj-bHE_xPrJq1lJc/s1600-h/clip_image006%5B2%5D%5B2%5D.jpg "clip_image006[2]")


![clip_image006[3]](https://blogger.googleusercontent.com/img/b/R29vZ2xl/AVvXsEhahJH3r2fayriEF_fQDMTXhSAtlychlmU0vnxk_wiZkN151AZmzEKdo4hyXYyqI5Q42_e2AYqZGfDJ-1zY8FDZTEEYpy-5jVm_Axfh_4mqQ4pd0kiT7nmRVNfsX4X4vYUcf9QiG_cL2pE/s1600-h/clip_image006%5B3%5D%5B2%5D.jpg "clip_image006[3]")
![clip_image010[1]](https://blogger.googleusercontent.com/img/b/R29vZ2xl/AVvXsEiikB1CS03icz3P7WaURM89WzscZpjsTDUzFQEQ7i5-eNVZAqXmvasscEQ_eKUZ1X_kEE3FvJc89Cltjl9KCLpK2aX7C9eKfCrXWZxttXsccm97CHu-4KR72ayE6CjUGbZUxj4NBNq9sCM/s1600-h/clip_image010%5B1%5D%5B2%5D.jpg "clip_image010[1]")
![clip_image012[1]](https://blogger.googleusercontent.com/img/b/R29vZ2xl/AVvXsEi2Pp19NH6-BpemNjVJGGlNbt3d_tqid3zGp76GCld1j15tBxw-BfRxKpXxw-nWfaRs77xnMfqyIePVmpE2arTnGo5ex4DzqmTvB-cwuNcSvBh8MCCPVaJkPeG-xuPaiM4azXUVCJzptQs/s1600-h/clip_image012%5B1%5D%5B2%5D.jpg "clip_image012[1]")
![clip_image002[11]](https://blogger.googleusercontent.com/img/b/R29vZ2xl/AVvXsEh2QwZ-m8mEiL2e8DOCQsHIdNaveF39jgKnIV2FNIWPFHxcXOx0I2djMO0TAFbD2K4RIrLhXt2vcRaHvHt0hW3pKwhxce8U8zigoVIDf0QwozqwTuBzcTnEqp7JwT_LOmzo1efYk-7Td6Y/s1600-h/clip_image002%5B11%5D%5B2%5D.jpg "clip_image002[11]")


